Table of Contents
Introduction
Step into the enchanting world of Winnie the Pooh and discover how to create a Winnie the Pooh baby shower decorations that is both whimsical and timeless.
As the beloved bear himself once said, “A little bit of honey makes everything better.” And what better way to celebrate the arrival of a new bundle of joy than with a baby shower filled with the honey-sweet charm and heartwarming details of Winnie the Pooh?
Whether you’re a seasoned party planner or a first-time host, this guide will equip you with all the inspiration and practical tips you need to create a truly memorable Winnie the Pooh baby shower.
Decorating the Hundred Acre Wood
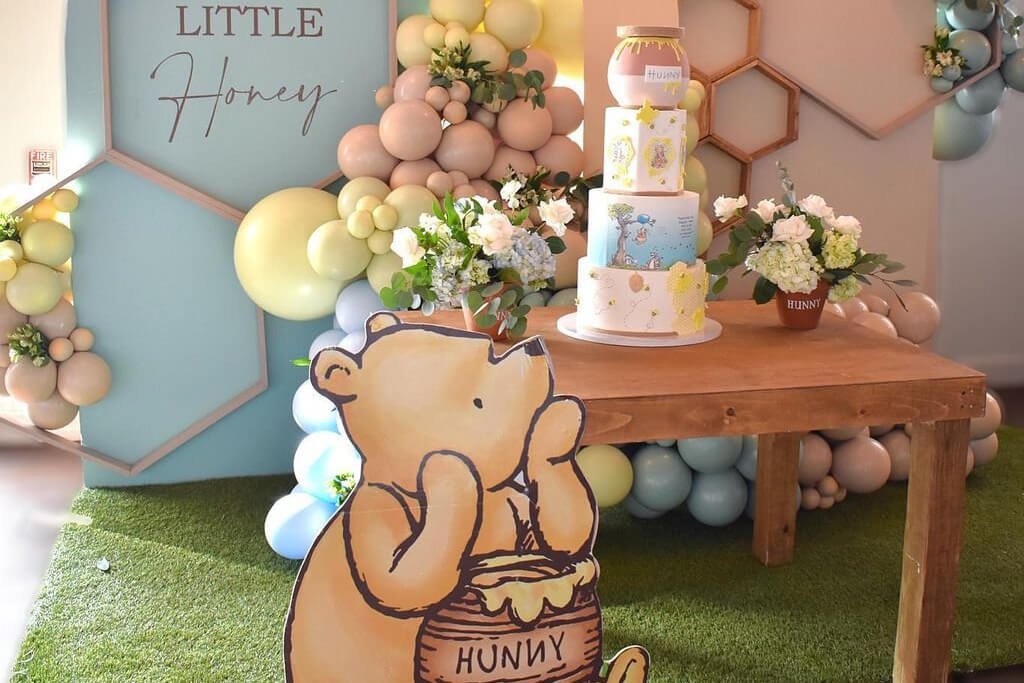
Step into the enchanting world of Winnie the Pooh and transform your venue into a Hundred Acre Wood wonderland with charming DIY honey pot centerpieces, playful character cutouts, and whimsical balloon arches. Let the honey-sweet charm of this beloved theme fill your baby shower with warmth and joy.
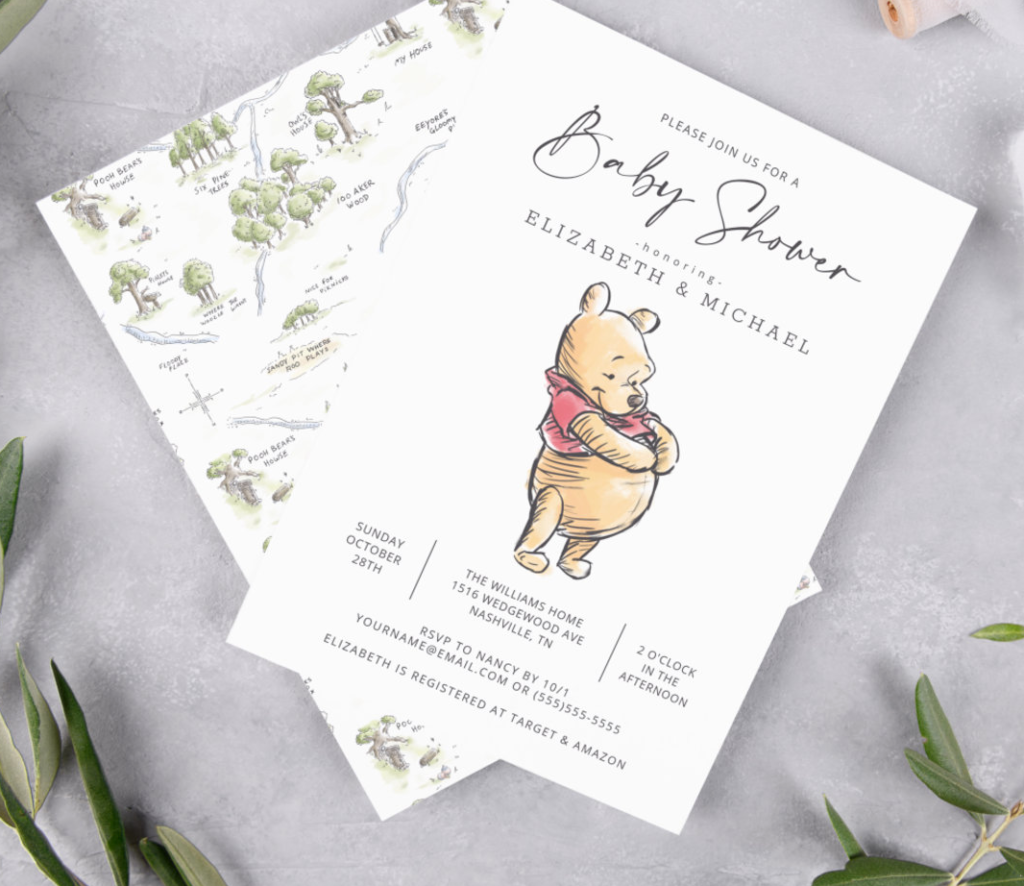
Winnie the Pooh Baby Shower Invitation
Delight your guests with these adorable edible Winnie the Pooh invitations, now available in printed form with matching envelopes for your convenience.
Classic Winnie the Pooh Baby Shower Invitation

Simple Watercolor Winnie the Pooh Baby Shower Invitation
Honey Pot Centerpieces
Ingredients:
- Recycled glass jars (various sizes)
- Yellow acrylic paint
- Artificial honey
- Raffia or twine (optional)
Instructions:
- Clean and dry the jars thoroughly.
- Paint the jars with yellow acrylic paint, ensuring even coverage.
- Once the paint is dry, apply a generous amount of artificial honey around the rim of the jars to create a dripping effect.
- For an extra touch of rustic charm, wrap raffia or twine around the jars.
Variations:
- Use jars of different sizes to create a tiered centerpiece effect.
- Decorate the jars with miniature Winnie the Pooh characters or honeybee cutouts.
- Fill the jars with honey-flavored candies or edible flowers for a delightful surprise.
Playful Character Cutouts
Ingredients:
- Cardboard sheets
- Yellow, orange, and black acrylic paint
- Black marker or pen
- Scissors
- Craft glue
- Wooden dowels (optional)
Instructions:
- Sketch outlines of Winnie the Pooh characters (Winnie the Pooh, Tigger, Eeyore, Piglet) on cardboard sheets.
- Cut out the character outlines using sharp scissors.
- Paint the characters with their signature colors: yellow for Winnie the Pooh, orange for Tigger, gray for Eeyore, and pink for Piglet.
- Use a black marker or pen to add facial features and details to each character.
- If using wooden dowels, attach them to the back of the cutouts to create stand-up characters.
Placement:
- Position the character cutouts around the venue to create a welcoming atmosphere.
- Group the characters together to form a whimsical scene.
- Place the cutouts near the entrance to greet guests upon arrival.
Whimsical Balloon Arches
Ingredients:
- Yellow, orange, and red balloons (various sizes)
- Balloon tape
- Balloon arch stand or free-standing structure
Instructions:
- Inflate balloons of different sizes, ensuring proper air filling for a balanced arch.
- Attach the balloons to the balloon tape, alternating colors to create a vibrant pattern.
- Secure the balloon tape to the balloon arch stand or free-standing structure.
- Shape the balloon arch into a desired form, such as a rainbow or a curved arch.
Strategic Placement:
- Place the balloon arch over the entrance to create a grand entrance.
- Frame the main table or dessert table with a whimsical balloon arch.
- Position the balloon arch near a photo booth for a fun backdrop.
Winnie the Pooh-Inspired Treats
Sweeten your Winnie the Pooh baby shower with a delightful array of treats inspired by the beloved characters and their favorite treats. From moist and flavorful honey cakes to adorable Tigger-themed cupcakes, these culinary creations will bring the honey-sweet charm of Hundred Acre Wood to your celebration.
Honey Cakes
These honey cakes are as fluffy as clouds and as sweet as honey, perfectly capturing the essence of Winnie the Pooh’s favorite food. The moist texture and rich honey flavor will have your guests asking for seconds.
Ingredients:
- 2 cups all-purpose flour
- 2 teaspoons baking powder
- 1/2 teaspoon baking soda
- 1/4 teaspoon salt
- 1 cup (2 sticks) unsalted butter, softened
- 1 cup granulated sugar
- 2 large eggs
- 1/2 cup honey
- 1/2 cup milk
Instructions:
- Preheat the oven to 350°F (175°C). Grease and flour two 9-inch round cake pans.
- In a medium bowl, whisk together the flour, baking powder, baking soda, and salt. Set aside.
- In a large bowl, cream together the butter and sugar until light and fluffy. Beat in the eggs one at a time, then stir in the honey.
- Gradually add the dry ingredients to the wet ingredients, alternating with the milk, and mix until just combined. Do not overmix.
- Divide the batter evenly between the prepared cake pans.
- Bake for 25-30 minutes, or until a toothpick inserted into the center comes out clean.
- Let the cakes cool completely in the pans before frosting.
Decoration Tips:
- Frost the cooled cakes with a generous layer of honey frosting.
- Garnish with edible flowers for a touch of elegance.
- Add miniature Winnie the Pooh characters made from fondant or marzipan for a playful touch.
Tigger-Themed Cupcakes
These adorable Tigger-themed cupcakes are the perfect way to add a touch of Tigger’s bouncy personality to your baby shower. The orange cake batter, black frosting stripes, and licorice stripes make them irresistible to both kids and adults.
Ingredients:
- 1 box orange cake mix
- 1 cup all-purpose flour
- 1/2 teaspoon baking powder
- 1/4 teaspoon salt
- 1 cup (2 sticks) unsalted butter, softened
- 1 cup granulated sugar
- 2 large eggs
- 1/2 cup milk
- 1/4 cup orange juice
- Orange frosting
- Black frosting
- Licorice stripes
Instructions:
- Preheat the oven to 350°F (175°C). Line a muffin tin with cupcake liners.
- In a medium bowl, whisk together the flour, baking powder, and salt. Set aside.
- In a large bowl, cream together the butter and sugar until light and fluffy. Beat in the eggs one at a time, then stir in the orange juice.
- Gradually add the dry ingredients to the wet ingredients, alternating with the milk, and mix until just combined. Do not overmix.
- Fill the cupcake liners with batter about 2/3 full.
- Bake for 15-20 minutes, or until a toothpick inserted into the center comes out clean.
- Let the cupcakes cool completely before frosting.
Decoration Tips:
- Frost the cooled cupcakes with orange frosting.
- Pipe black frosting stripes around the cupcakes to resemble Tigger’s stripes.
- Add licorice stripes to represent Tigger’s tail.
Eeyore’s Gray Cloud Biscuits
These soft and chewy gray cloud biscuits are inspired by Eeyore’s favorite treat. The delicate flavor and cloud-like texture will add a touch of whimsy to your baby shower.
Ingredients:
- 2 cups all-purpose flour
- 1/2 cup granulated sugar
- 1 tablespoon baking powder
- 1/4 teaspoon salt
- 1 cup cold heavy cream
- 1/2 cup gray food coloring
Instructions:
- Preheat the oven to 400°F (200°C). Line a baking sheet with parchment paper.
- In a large bowl, whisk together the flour, sugar, baking powder, and salt.
- Gradually add the heavy cream and food coloring to the dry ingredients, mixing until just combined. Do not overmix.
- Drop rounded tablespoons of dough onto the prepared baking sheet.
- Bake for 12-15 minutes, or until the biscuits are lightly browned and firm to the touch.
- Let the biscuits cool completely before frosting.
Enchanting Favors for Your Guests
Send your guests home with adorable keepsakes that capture the essence of Winnie the Pooh, a reminder of the heartwarming celebration they just witnessed. These charming favors will leave a lasting impression, adding a touch of sweetness to the day.
Personalized Honey Jars
These personalized honey jars are a delightful way to share the honey-sweet charm of Winnie the Pooh with your guests. With a few simple touches, you can transform ordinary jars into enchanting keepsakes that everyone will love.
Ingredients:
- Small glass jars (with lids)
- White or kraft paper labels
- Brown twine or ribbon
- Winnie the Pooh-themed charms or embellishments (optional)
- Honey (homemade or store-bought)
Instructions:
- Clean and dry the glass jars thoroughly.
- Cut out small labels from white or kraft paper.
- Personalize the labels with handwritten names, messages, or Winnie the Pooh-inspired quotes.
- Attach the personalized labels to the jars using glue or adhesive tape.
- Wrap brown twine or ribbon around the necks of the jars, securing them with a bow or knot.
- Add Winnie the Pooh-themed charms or embellishments, such as miniature honey pots, bees, or Winnie the Pooh characters, for a touch of enchantment.
- Fill the jars with honey, either homemade or store-bought, ensuring they are filled to the brim for a visually appealing presentation.
Miniature Teddy Bears
These adorable miniature teddy bears, inspired by Winnie the Pooh’s iconic appearance, will make cherished keepsakes for your guests. The soft felt and cuddly form perfectly capture the essence of the beloved bear, bringing a touch of warmth to the baby shower.
Ingredients:
- Light brown felt
- Dark brown felt
- Black embroidery thread or marker
- Needle
- Stuffing
- Small bows or embroidery floss (optional)
Instructions:
- Cut out two pieces of light brown felt for the teddy bear’s body, two pieces for the ears, and one piece for the nose.
- Cut out two pieces of dark brown felt for the teddy bear’s feet and one piece for the mouth.
- Sew the two body pieces together, leaving a small opening at the bottom.
- Fill the body with stuffing, ensuring it is evenly distributed.
- Sew up the opening at the bottom.
- Attach the ears to the head, stitching them securely in place.
- Embroider or sew on black dots for the teddy bear’s eyes.
- Attach the nose to the center of the face, stitching it firmly.
- Sew on the dark brown felt mouth.
- Attach the feet to the bottom of the body, stitching them securely in place.
- For a touch of personalization, add a small bow or embroider initials on the teddy bear’s chest.
Piglet-Themed Cookies
These adorable Piglet-themed cookies, inspired by the beloved character’s signature pink hue and endearing personality, will make delightful favors for your guests. The delicate sugar paste details and edible marker accents bring these cookies to life, adding a touch of whimsy to the baby shower.
Ingredients:
- Sugar cookie dough (homemade or store-bought)
- Pink sugar paste
- Edible markers (black and pink)
- Cookie cutters (round, oval, or pig-shaped)
- Small paintbrushes (optional)
Instructions:
- Roll out the sugar cookie dough on a lightly floured surface to a desired thickness.
- Cut out shapes from the dough using cookie cutters.
- Bake the cookies according to the recipe instructions or package directions.
- Once the cookies are cool, knead the pink sugar paste until smooth and pliable.
- Roll out the sugar paste thinly, ensuring it is uniform in thickness.
- Using cookie cutters, cut out shapes from the sugar paste that match the cookie shapes.
- Gently press the sugar paste cutouts onto the cooled cookies.
- Use edible markers to add facial features to the Piglet cookies, such as black dots for eyes, a pink dot for the nose, and a curved line for the mouth.
- For added detail, use paintbrushes to add tiny freckles or stripes to the Piglet cookies.
- Allow the decorated cookies to dry completely before packaging.
Packaging Tips:
- Place each cookie in an individual cellophane bag or small paper box.
- Tie a ribbon or twine around the bag or box for a touch of elegance.
- Attach a small tag with a personalized message or “Thank You” note.
What are some popular themes for Winnie the Pooh baby showers?
– Honey-sweet charm
– A Winnie the Pooh wonderland
– Step into Hundred Acre Wood
– Honey pots and playful characters
What are some essentials for decorating a Winnie the Pooh baby shower?
– Honey pot centerpieces
– Playful character cutouts
– Whimsical balloon arches
– Honey cakes
– Tigger-themed cupcakes
– Eeyore’s gray cloud biscuits
– Personalized honey jars
– Miniature teddy bears
– Piglet-themed cookies
What colors should I use for a Winnie the Pooh baby shower?
– Yellow
– Orange
– Red
– Blue
– Brown
What are some fun activities for a Winnie the Pooh baby shower?
– Pin the tail on Tigger
– Honey pot toss
– Pooh-inspired pinata
– Honey-tasting contest
– Winnie the Pooh coloring station
What are some creative ways to serve food and drinks at a Winnie the Pooh baby shower?
– Serve honey cakes in miniature honey pots.
– Make Tigger-themed cupcakes with orange frosting and licorice stripes.
– Create Eeyore’s gray cloud biscuits with white frosting and sprinkles.
– Serve honey-flavored lemonade or punch.
– Offer a variety of honey-themed snacks, such as honey-roasted almonds or honey-dipped pretzels.
What are some thoughtful favors for guests at a Winnie the Pooh baby shower?
– Personalized honey jars
– Miniature teddy bears
– Piglet-themed cookies
– Winnie the Pooh-themed bookmarks
– Honey-flavored candies
What are some ways to personalize a Winnie the Pooh baby shower?
– Use the baby’s name or initials throughout the decorations.
– Create a custom Winnie the Pooh-themed banner.
– Make personalized favors for guests.
– Incorporate special touches from the baby’s nursery.
– Add a personal message to the cake.
What are some tips for creating a budget-friendly Winnie the Pooh baby shower?
– DIY decorations are always a great way to save money.
– Look for affordable party supplies at discount stores or online retailers.
– Use recycled materials to create unique decorations.
– Host the shower at home to save on venue rental costs.
– Ask friends and family for help with planning and decorating.
What are some ways to make a Winnie the Pooh baby shower more gender-neutral?
– Use a mix of yellow, orange, and red decorations.
– Choose Winnie the Pooh characters of both genders.
– Serve gender-neutral food and drinks.
– Use gender-neutral language in invitations and decorations.
How can I make my Winnie the Pooh baby shower more memorable?
– Consider incorporating interactive elements into the theme, such as a Winnie the Pooh-themed photo booth or a honey-tasting contest.
– Personalize the decorations and favors to make them extra special for your guests.
– Capture the magic of the moment with plenty of photos and videos to cherish for years to come.
– Create a personalized playlist of Winnie the Pooh songs to set the mood for the celebration.
– Leave a lasting impression by sending handwritten thank-you notes to your guests after the shower.
Conclusion
Step back and admire your very own Hundred Acre Wood, a whimsical wonderland filled with honey-sweet charm and heartwarming details. Your Winnie the Pooh-themed baby shower is not just a celebration; it’s a journey into the enchanting world of childhood innocence and the enduring friendship of beloved characters.
As you welcome your guests into this magical realm, let the playful spirit of Winnie the Pooh guide you in creating a truly memorable experience. From the honey pot centerpieces and playful character cutouts to the delightful treats and enchanting favors, every element of the theme reflects the warmth and joy that Winnie the Pooh has brought to generations of children and adults alike.
Embrace the whimsical and heartwarming elements of this theme, allowing your creativity to shine through as you transform your venue into a place where imagination runs wild and cherished memories are made. Let the honey-sweet aroma of Winnie the Pooh’s favorite treat fill the air, and let the spirit of friendship and joy permeate the atmosphere, creating a celebration that will be fondly remembered long after the last honey pot has been emptied and the last balloon has floated away.
Share your Winnie the Pooh baby shower ideas, experiences, and photos in the comments below. We’d love to see how you’ve brought the magic of Hundred Acre Wood to life!